


PictureT

PictureT
619049867326525670
🇬🇧 🇨🇵 🇪🇸 Mostly in 𝑷𝒊𝒙𝒊𝒗
🌐 https://picture-t.com/
1.2K
Followers
206
Following
220.7K
Runs
211
Downloads
16.8K
Likes
5.3K
Stars
AI Tools
View AllPictureT
🪐 Grok Companions: Ani [Illustrious v2.0]

PictureT
🧊 3D Render Graphics [Illustrious v2.0]
Sensitive content (17+)
PictureT
🌌 Stellar Blade Project: EVE [Illustrious 2.0]

PictureT
📸 Shutterbug | FLUX.1 Krea

PictureT
⛩️ Momiji the Shrine Maiden [Illustrious v2.0]

PictureT
📀 Traditional Media: 2000s Style [Illustrious v2.0]

PictureT
[Illustrious v2.0] • Traditional Media (Ai Tool)
PictureT
🍥Animatensor | SDXL V P R E D

PictureT
🧧 SEENA - 𝗖𝗢𝗟𝗢𝗥𝗙𝗨𝗟 iGame Event - Round 3

PictureT
🐯 Chroma for TensorArt – v32 🔥

PictureT
[ILv2.0] - Low Cost Generation

PictureT
📸 Shutterbug | SD3.5L TurboX

PictureT
Budokai III | FLUX.1 by @seal_harmful_40

PictureT
💖 St. Valentine: Floral Bouquet [FLUX.1 DEV]

PictureT
🐍 Snakeyear - Minisculpture | SD3.5L Turbo

PictureT
📹 Shutterbug | SVD & SD3.5L Turbo

PictureT
Western Vintage | 𝗣𝗼𝗻𝘆𝗩𝟲 BETA

PictureT
Tool | Testing Playground

PictureT
Bande Dessinée | FLUX
Models
View All
LORA KREA_2
EXCLUSIVE
HED☽NICA™ — Expressive-[K2] v1.0
PictureT

LORA KREA_2
EXCLUSIVE
HED☽NICA™ — Money Shot-[K2] v1.4
PictureT

LORA KREA_2Updated
EXCLUSIVE
[K2] Dead or Alive - Helena Douglas-v1.10
PictureT

LORA KREA_2Updated
EXCLUSIVE
[K2] Dead or Alive - Christie-v1.10
PictureT

LORA KREA_2Updated
EXCLUSIVE
🅷 Sanni Koivusaari-v1.10
PictureT

LORA KREA_2Updated
EXCLUSIVE
🅷 Katya Rybakov-v1.20
PictureT

LORA KREA_2
EXCLUSIVE
[K2] Final Fantasy VII: Scarlet-v2.0
PictureT

LORA KREA_2
EXCLUSIVE
Jazmin Peralta-V1.10
PictureT

LORA KREA_2
EXCLUSIVE
livindeadyaz-v1.20
PictureT

LORA KREA_2
EXCLUSIVE
Christy White-v1.40
PictureT
LORA KREA_2
EXCLUSIVE
[K2] Golden Age Western Style-v0.9
PictureT
LORA KREA_2
EXCLUSIVE
[K2] Modern Western Style-v1.0
PictureT
LORA FLUX.1 Kontext Dev
Style Swap: AI Illustration-v3.4
PictureT

DORA Illustrious
EXCLUSIVE
[WAI-Mature v1.0] shading style by_picturet-v1.0
PictureT

VIDEO HunyuanVideo_1_5_480P
EXCLUSIVE
[HY1.5] [NSFW] Heeled Defiance-v1.0
PictureT

VIDEO HunyuanVideo_1_5_480P
EXCLUSIVE
[HY1.5] [Visual Design] Dazzling Particles-v1.0
PictureT

VIDEO HunyuanVideo_1_5_480P
EXCLUSIVE
[HY1.5] [Character] Magical Beast: Kitsune-v1.0
PictureT

VIDEO HunyuanVideo_1_5_480P
EXCLUSIVE
[HY1.5] [sci fi] portal-v1.0
PictureT

VIDEO HunyuanVideo_1_5_480P
EXCLUSIVE
[HY1.5] [Space Design] Composition by PictureT-v1.0
PictureT

VIDEO HunyuanVideo_1_5_480P
EXCLUSIVE
[HY1.5] [Anime] Retro Anime-Style-v1.0
PictureT
Workflows
View All
22 Nodes
Basic SDXL + Refiner Workflow by OpenArt
PictureT

15 Nodes
Budokai III • @seal_harmful_40 FLUX.1 Workflow (OpenAi)
PictureT

25 Nodes
🐍 Snakeyear - SD3.5L Turbo (Template)
PictureT

10 Nodes
worflow/FLUX.1-Turbo-Alpha
PictureT

8 Nodes
Christmas Walkthrough | Image to Prompt in Comfy
PictureT
14 Nodes
workflow/SD3.5
PictureT
14 Nodes
🎃 Halloween 2024 • Pony Diffusion Workflow
PictureT
17 Nodes
Flux1 Advanced Template [LoRA+t5xxl+DynamicThresholding]
PictureT
11 Nodes
SDXL Dual ClipTextEncoder CLIP L & CLIP G, Basic Template
PictureT
11 Nodes
Fluxdev_fp8 Basic Template
PictureT
Articles
View All![[K2] Prompting Western Style](https://image.tensorartassets.com/cdn-cgi/image/anim=true,plain=false,w=112,q=85/posts/images/619049867326525670/325d4bcb-4c31-4e89-ad81-fdf0c8a2257e.jpg)
[K2] Prompting Western Style
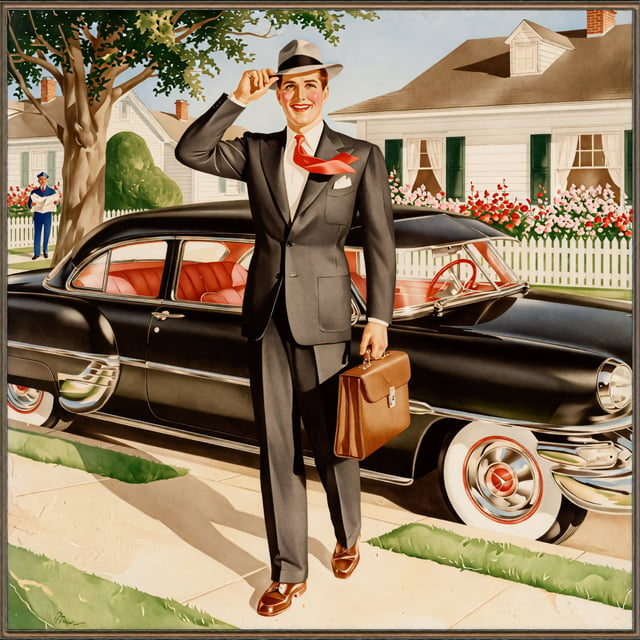
Welcome to my realm; here I'll teach you about my go-to prompting style when western visuals are the objective, this is nor an art/illustration class so I'll tell you the keys to start; then you can dig a lot more if you're interested. I also suggest you to check my models to get improved visuals.Krea2 Prompting StyleKrea 2 breaks away from traditional keyword-heavy prompting. It acts as an aesthetic-first model that favors flowing, natural-language prose over comma-separated tags. Its prompting style relies heavily on vivid storytelling, environmental context, and image references to deliver a highly artistic output. 1. Structure: Narrative Prose vs. Keyword ListsKrea 2 responds best to flowing descriptions rather than mechanical, comma-stuffed prompts. The underlying architecture translates descriptive, long-form narratives into striking visuals. The Formula: Focus on the sequence of Subject + Action + Scene/Environment + Lighting + Mood/Composition.Avoid Meta-Language: Do not state "In this photo..." or "The image shows...". Start directly with the subject and immediately layer in the visual textures and lighting.Text Rendering: If you need specific text generated, put the exact words in quotation marks.2. The "Creativity" Slider & Prompt AdherenceUnlike traditional models that strictly attempt to render exactly what you write, Krea 2 interprets the mood, style, and visual direction of your prompt. Its creativity settings allow you to dictate how much freedom the AI hasRaw: Instructs Krea 2 to adhere strictly to your text, prioritizing literal translation.High: Gives the model room to fill in stylistic or compositional gaps.Prompt Adherence Limits: Because Krea 2 is biased heavily toward 3D renders, digital artwork, and cinematic aesthetics, it can sometimes be difficult to prompt it for purely flat, neutral, or highly specific technical details. 3. Workflow Integrations: Mood Boards and Style ReferencesKrea 2’s true power lies in its multimodal capabilities. Often, writing prompts is secondary to using visual references. Style References & Mood Boards: Rather than spending hours trying to prompt for "cinematic high-contrast lighting", users upload 1–10 reference images or full mood boards. Krea 2 processes the visual weight, color relationships, and aesthetic taste of those references, allowing you to use simple text for subject matter.VLM Processing: The Vision Language Model (VLM) translates reference images into textual descriptions and combines them with your text. Therefore, controlling style strength (the intensity of the mood board's influence) is a critical step for overriding unwanted aesthetic bleed. 4. Practical Prompt ExampleTo understand how to weave subject, lighting, and composition together:[art-style: Golden Age 1940s American pin-up illustration]Digital vintage lithograph reproduction. Clean, bold ink outlines with slightly exaggerated contours, smooth airbrushed gouache gradients for skin shading, and high-contrast comic book ink illustration details. Fine ink grain, faint paper yellowing, and minor edge wear.[/art-style]A beautiful, curvaceous woman in her mid-20s standing at a sunny retro kitchen counter, playfully looking over her shoulder at the viewer while baking. She wears a fitted 1950s floral house dress with a nipped waist, full skirt, white apron with ruffles, pearl necklace, and red high heels. Her hair is perfectly styled in victory rolls or soft waves. She holds a mixing bowl in one arm and a wooden spoon in the other, with a flirtatious smile and arched back for classic pin-up S-curve pose. Elements: bright yellow kitchen with chrome appliances, fresh cookies on a plate, open window with curtains blowing, pie cooling on the sill, warm cheerful lighting streaming in.[art-style: Golden Age 1940s American pin-up illustration]Digital vintage lithograph reproduction. Clean, bold ink outlines with slightly exaggerated contours, smooth airbrushed gouache gradients for skin shading, and high-contrast comic book ink illustration details. Fine ink grain, faint paper yellowing, and minor edge wear.[/art-style]A handsome, square-jawed man in his early 30s walking confidently toward the viewer on a sunny suburban sidewalk, one hand adjusting his fedora, the other holding a briefcase. He wears a tailored charcoal-gray suit with a crisp white shirt, red power tie, and polished oxford shoes. Behind him is his gleaming chrome 1950s sedan parked at the curb of a neat picket-fence house with blooming flower beds. Morning golden sunlight, light breeze lifting his tie slightly, optimistic smile, strong heroic posture with broad shoulders emphasized. Background includes white clapboard houses, a newspaper boy in the distance, and a big shady oak tree.[art-style: western comic illustration]Highly detailed, anatomically grounded figures with realistic proportions and expressive faces. Fine cross-hatching and brushwork for texture. Strong chiaroscuro lighting with deep shadows and highlighted focal points. Cinematic composition, authentic Western details (tack, spurs, architecture), subtle environmental storytelling. Matte ink finishes with occasional wash or gouache-like gradients.[/art-style]A glamorous early-20s white blonde woman with straight platinum blonde hair (lowlights, chunky highlights, and chunky layers typical of the era) sitting at a manicure station in a trendy 2000s beauty salon. She wears a pink velour Juicy Couture-style tracksuit top with matching low-rise pants, large hoop earrings, layered necklaces, and glossy lip gloss. She holds one hand out elegantly for a nail technician while checking her flip phone with the other, confident and self-assured expression with a slight smile. Salon details: bright fluorescent lighting with pink accents, mirrors everywhere, rows of nail polish bottles, celebrity magazines (Us Weekly, Star), Victoria’s Secret bag on the floor, and a “Just Pink” salon sign. Materialistic, aspirational Y2K feminine energy.[art-style: western comic illustration]Highly detailed, anatomically grounded figures with realistic proportions and expressive faces. Fine cross-hatching and brushwork for texture. Strong chiaroscuro lighting with deep shadows and highlighted focal points. Cinematic composition, authentic Western details (tack, spurs, architecture), subtle environmental storytelling. Matte ink finishes with occasional wash or gouache-like gradients.[/art-style]A young boy (around 10) and girl (around 8) sitting side-by-side on a living room floor, completely hypnotized by early 2000s videogames. The boy wears a baggy graphic t-shirt (perhaps with a Pokémon or WWE logo), cargo shorts, and sneakers, leaning forward intensely with a GameCube or Xbox controller. The girl wears a pastel hoodie with butterfly graphics, low-rise jeans, and pigtails with colorful clips, holding a pink controller. Both have wide-eyed, zoned-out expressions, mouths slightly open. Room details: CRT television with glowing screen showing a racing or fighting game, scattered game cases (GTA, Halo, Mario), snack wrappers (Cheetos, Mountain Dew), posters of pop stars or wrestlers on the walls, early 2000s middle-class suburban living room with beige carpet and corded landline phone. Soft indoor lighting with TV glow illuminating their faces.How I prompt a Western StyleIn general and for most text to image models: western illustrations are categorized by collectors into five main historical ages and further divided by genres and formats.Western Style: Platinum Age Period:[1880's 1940's] LoRA: [1]Focuses on newspaper comic strip reprints, pulp magazines, and the first true comic books (e.g., The Yellow Kid).Western Style: Golden Age Period:[1940's 1955's] LoRA: [1]Defined by a 10c cover price and the birth of superheroes. Iconic characters debuted here, including Superman, Batman, Wonder Woman, and Captain America. Western Style: Silver Age Period:[1955's 1970's] LoRA: [1]Revitalized the industry with the rise of Marvel Comics. It introduced classic characters such as Spider-Man, the Fantastic Four, the X-Men, and the Hulk. Western Style: Bronze Age Period:[1970's 1985's] LoRA: [1]Brought darker, socially relevant storylines (dealing with issues like racism and substance abuse) alongside a massive surge in horror and fantasy titles.Western Style: Modern Age Period:[1985's 2000's] LoRA: [1]Features a greater focus on complex, creator-owned stories, "event" crossovers, and high-quality standalone graphic novels. Copy and PasteI developed some prompt style prompts ready to use and modify. Use them wisely.🗂️ classic fine art[art-style: Golden Age 1940s American pin-up illustration]Digital vintage lithograph reproduction. Clean, bold ink outlines with slightly exaggerated contours, smooth airbrushed gouache gradients for skin shading, and high-contrast comic book ink illustration details. Fine ink grain, faint paper yellowing, and minor edge wear.[/art-style]🗂️ comic book[art-style: comic book illustration]Bold, clean black ink outlines with varying line weight for emphasis on figures and action. Dynamic poses, heroic proportions, simplified anatomy with strong silhouettes. Classic newsprint halftone dots, slight paper aging/yellowing, and vibrant but slightly muted vintage palette.[/art-style]🗂️ comic illustration[art-style: western comic illustration]Highly detailed, anatomically grounded figures with realistic proportions and expressive faces. Fine cross-hatching and brushwork for texture. Strong chiaroscuro lighting with deep shadows and highlighted focal points. Cinematic composition, authentic Western details (tack, spurs, architecture), subtle environmental storytelling. Matte ink finishes with occasional wash or gouache-like gradients.[/art-style]
![Forge World Cup [PicrureT]](https://image.tensorartassets.com/cdn-cgi/image/anim=true,plain=false,w=112,q=85/article/619049867326525670/c3cb75c1-5d48-49bf-b5d7-ba1eab3ff1b7.gif)
Forge World Cup [PicrureT]
Event: https://tensor.art/blackboard/tensorforgecupOpen TensorForge and create your World Cup–themed work online, then publish it on the platform. You can use the canvas yourself, but we recommend the brand-new Agent — just create through conversation.Turn your creation process into an image or video post and share it on X and Instagram. Tutorial-style posts are recommended for a higher chance of winning.Make a post link, submit your TensorForge canvas link + your X / InstagramPictureT's Guide (How to)Text to ImageImage to VideoAgent UsagePictureT's PostsSocial media: https://x.com/SINthetic_47Tensor Profile: https://tensor.art/u/619049867326525670UID: 619049867326525670Canvas Link: https://canvas.tensor.art/detail/1009374948994629746Card Design / Player Stampx: https://x.com/SINthetic_47/status/2065615408309182547/photo/1 (USA)x: https://x.com/SINthetic_47/status/2065501983557972337/photo/1 (Canada)tf: https://canvas.tensor.art/post/1009385503876721829 (USA)tf: https://canvas.tensor.art/post/1009387536470032192 (MEXICO)tf: https://canvas.tensor.art/post/1009395326466918520 (JAPAN)Broadcast Goal Fan Camx: https://x.com/SINthetic_47/status/2066930714784809138/photo/1 (France vs Senegal)x: https://x.com/SINthetic_47/status/2067274118894960788/photo/1 (Portugal vs Rep Congo)x: https://x.com/SINthetic_47/status/2066563060672663599/photo/1 (Uruguay vs Saudi Arabia)x: https://x.com/SINthetic_47/status/2066201304561504712/photo/1 (Germany vs Curacao)x: https://x.com/SINthetic_47/status/2066229900126638172/photo/1 (Netherlands vs Japan)x: https://x.com/SINthetic_47/status/2065844409350881455/photo/1 (Brazil vs Morocco)x: https://x.com/SINthetic_47/status/2066533733440663785/photo/1 (Spain vs Cape Verde)tf: https://canvas.tensor.art/post/1010450045880795178 (Spain vs Cape Verde)Mexican Merchandisex: https://x.com/SINthetic_47/status/2074908502858895659tf: https://canvas.tensor.art/post/1011296867402694220Mexican and American World Cup Mascotx:tf: https://canvas.tensor.art/post/1012360176751104467 (USA)tf: https://canvas.tensor.art/post/1012356106195884008 (MEXICO)Player Soccer Flyerx: https://x.com/SINthetic_47/status/2069894808680751228/photo/1 (Neymar jr memorial)x: https://x.com/SINthetic_47/status/2069882160446677340/photo/1 (Ochoa Memorial)x: https://x.com/SINthetic_47/status/2069459483642744916/photo/1 (Bernardo Silva)tf: https://canvas.tensor.art/post/1013445888648975556 (Bernardo Silva)Soccer Ball's Chip Videox: https://x.com/SINthetic_47/status/2074907205900394573 (Croatia Tragedy)tf: https://canvas.tensor.art/post/1013445662089461347National Team Advances to a Next Roundx: https://x.com/SINthetic_47/status/2072808532416581664/video/1 (Mexico x USA)tf: https://canvas.tensor.art/post/1016588112492526226 (Mexico x USA)

Qwen Overview (t2i)
Qwen-Image: Redefining Text-Aware Image GenerationIn the rapidly evolving landscape of AI-powered visual creation, Qwen-Image stands out as a groundbreaking foundation model—particularly for one long-standing challenge: high-fidelity, context-aware text rendering in images. Where previous diffusion models often produced garbled, misplaced, or stylistically inconsistent text, Qwen-Image delivers typographic precision that feels native to the scene. This isn’t just an incremental improvement—it’s a paradigm shift for designers, marketers, and creators who rely on legible, integrated text as a core visual element.Why Qwen-Image Excels1. Professional-Grade Text IntegrationQwen-Image treats text not as an overlay, but as an intrinsic component of the visual composition. Whether it’s a storefront sign, a product label, or a poster headline, the model ensures:Perfect legibility across fonts and sizesContextual harmony with lighting, perspective, and materialSeamless blending into diverse visual styles—from photorealism to anime2. True Multilingual CapabilityThe model handles both Latin and logographic scripts with remarkable accuracy:Crisp English typography with proper kerning and alignmentComplex Chinese characters rendered with correct stroke order and spatial coherenceThis makes Qwen-Image uniquely valuable for global campaigns, localization workflows, and cross-cultural design.3. Creative Versatility Beyond TextDon’t let its text prowess overshadow its broader strengths. Qwen-Image supports:Photorealistic scenesStylized illustrations (anime, watercolor, cyberpunk, etc.)Advanced image editing (object insertion/removal, pose manipulation, style transfer)All while maintaining consistent text quality—a rare feat in multimodal generation.4. Precision Control for ProfessionalsWith fine-grained parameters like `true_cfg_scale` and resolution-aware latent sizing, users can balance speed, fidelity, and artistic intent—making it suitable for both rapid prototyping and production-grade output.Getting Started: Qwen-Image in ComfyUIQwen-Image integrates smoothly into ComfyUI workflows. Below is a streamlined setup guide based on real-world testing.Step 1: Configure Your CanvasUse the `EmptySD3LatentImage` node to define output dimensions:Recommended base resolution: `1328×1328` (square)Supports multiple aspect ratios (e.g., 16:9, 3:2) via custom width/heightSet `batch_size = 1` for optimal quality and VRAM efficiencyStep 2: Craft a High-Signal PromptIn the `CLIP Text Encode (Positive Prompt)` node, specificity is key:Describe the scene, objects, and lightingExplicitly state the exact text you want rendered (e.g., “a chalkboard reading ‘OPEN 24/7’”)Specify typography style, placement, and integration context (e.g., “neon sign in the upper left, glowing softly”)Add quality boosters: “Ultra HD, 4K, cinematic composition”💡 Pro Tip: Qwen-Image responds exceptionally well to prompts that treat text as part of the environment—not an add-on.Step 3: Optimize Sampling SettingsUse the following tested ComfyUI configuration for reliable results:Advanced OptimizationFor speed: Reduce steps to 10–15 and CFG to 1.0 (ideal for iteration)For detail: Increase Shift if output appears blurryVRAM usage: ~86% on RTX 4090 (24GB); expect ~94s first run, ~71s thereafterUnderstanding Qwen-Image’s Content PoliciesAs a model developed by Alibaba’s Tongyi Lab in China, Qwen-Image incorporates strict content safety mechanisms aligned with national regulations and ethical AI guidelines.Hard Restrictions (Likely Blocked)The model will refuse or filter prompts containing:Nudity/Sexual Content: “nude,” “underwear,” “sexy pose”Graphic Violence: “blood,” “gore,” “corpse,” “gunfight”Illegal/Harmful Acts: “drug use,” “terrorism,” “hate symbols”Politically Sensitive Topics: Especially those related to Chinese sovereignty, history, or social stabilityCopyright & Trademark EnforcementQwen-Image avoids generating:Recognizable IP characters (*“Rachel from Ninja Gaiden,” “Mickey Mouse”*)Branded logos (*“Coca-Cola,” “Nike swoosh”*)Exact replicas of famous artworks✅ Workaround: Use original descriptions:❌ “Rachel from Ninja Gaiden with red hair”✅ “A fierce female ninja with long red hair, crimson armor, and twin curved blades, anime style”Language-Based ModerationChinese prompts undergo stricter filtering (especially around politics, religion, and social narratives)English prompts have slightly more flexibility—but core safety filters still applyThe official demo uses neutral, positive imagery (e.g., “beautiful Chinese woman,” “π≈3.14159…”), reflecting a “safe-by-default” design philosophyHow Filtering WorksWhile not fully documented, the system likely employs:Prompt classifiers that reject banned keywordsLatent/output scanners that blur or block unsafe imagesTraining data curation that excludes sensitive contentCFG-guided bias toward “safe” interpretations during denoising⚠️ Important: Even seemingly innocent prompts may be filtered if the generated image is flagged (e.g., for revealing clothing or weapon visibility).What You Can Safely CreateOriginal characters (non-explicit attire)Stylized fantasy scenes (*“anime battle with energy swords, no blood”*)Product mockups, signage, posters with custom textLandscapes, architecture, fashion, and conceptual artMultilingual designs (especially English + Chinese)Final NotesLicense: Qwen-Image is released under Apache 2.0—free for commercial use.Responsibility: Users must ensure outputs comply with local laws and platform policies.Testing: Always validate edge-case prompts before production deployment.AcknowledgmentsThis workflow builds on the pioneering work of the Qwen team at Alibaba Cloud, who developed the 20B-parameter MMDiT architecture that powers Qwen-Image’s unmatched text-rendering capabilities. Special thanks also to the ComfyUI community for enabling seamless, accessible integration of this cutting-edge model.With Qwen-Image, text is no longer a limitation—it’s a creative superpower.

WAN2.2 Overview and How to Prompt?
AI OverviewThe Wan 2.2 model, specifically referring to the ComfyUI version for image generation, has a prompt token limit of 256 input tokens. Extending the prompts can effectively enrich the details in the generated videos, further enhancing the video quality. Therefore, is recommend enabling a prompt extension (By default, the Qwen model is used for this extension.).According to the official paper you should build your LLM profile around the next points:Instruct the LLM to add details to prompts without altering their original meanings, enhancing the completeness and visual appeal of the generated scenes.Rewritten prompts should incorporate natural motion attributes, where we add appropriate actions for the subject based on its category to ensure smoother and more fluent motion in the generated videos.Structuring the rewritten prompts similarly to the post-training captions, beginning with the video style, followed by an abstract of the content, and concluding with a detailed description. This method helps align prompts with the distribution of high-quality video captionsMain Feature: Cinematic LevelWan2.2, have focused on incorporating the following innovations:👍 Cinematic-level Aesthetics: Wan2.2 incorporates meticulously curated aesthetic data, complete with detailed labels for lighting, composition, contrast, color tone, and more.⚠️ Important: Always use Image-to-Video (I2V) mode for reference. The model does not understand abstract concepts well without visual guidance. If you need fixed poses or longer, controlled shots, switch to First-Last Frame to Video (FLF2V) mode instead.General GuidelinesUse natural language to describe specific actions — avoid abstract concepts or keyword-stuffed phrases like in traditional AI image generation.✅ "The girl slowly lifts her right hand to adjust her sunglasses."❌ "Girl, hand, sunglasses, cool pose, stylish."❌ "Doing something cool with her hands."Focus on one action per shot. Don't describe multiple actions in a single prompt, or the model may not be able to complete them within 5 seconds.✅ "The man waves his hand and smiles at the camera."❌ "The man walks into the room, picks up a book, reads a bit, then waves."❌ "She turns, waves, and jumps in excitement."Be specific about which body parts are involved, what kind of clothing is worn, and what exactly is happening — avoid vague terms like 'clothes'.✅ "She pulls down the hood of her gray hoodie with both hands."❌ "She fixes her clothes."❌ "The character interacts with her outfit."Avoid overly complex or large movements for now, such as bending over or torso twisting, as they may result in glitches or fail to render properly.✅ "He raises his left arm and points forward."❌ "She bends down to tie her shoes."❌ "The dancer spins twice and stretches backward."Examples✅ Clear, specific action with natural phrasing, The woman winks at the camera while gently adjusting her hair.🟡 Action is completed but feels vague or disconnected. A young man raises his arm and looks down at his wristwatch.🟥 Too many actions stacked; difficult to complete in time. The woman kneels down, opens a backpack, takes out a book, and waves.🟥 Multiple steps, only the first action may be completed. The child bounces a ball and then tries to jump and spin.🟥 Too slow; the action doesn't finish in 5 seconds. The man slowly opens a wrapped gift box, carefully lifting the lid and removing the ribbon.🟥 Too vague; lacks body part or clothing details. Subject adjusts their outfit and interacts with it.License AgreementThe models in this repository are licensed under the Apache 2.0 License. WAN claim no rights over the your generated contents, granting you the freedom to use them while ensuring that your usage complies with the provisions of this license. You are fully accountable for your use of the models, which must not involve sharing any content that violates applicable laws, causes harm to individuals or groups, disseminates personal information intended for harm, spreads misinformation, or targets vulnerable populations. For a complete list of restrictions and details regarding your rights, please refer to the full text of the license.Source:https://arxiv.org/abs/2503.20314https://wan2.ai/hub/blog/wan-2-1-prompting-guidehttps://huggingface.co/Wan-AI/Wan2.2-T2V-A14B-Diffusershttps://alidocs.dingtalk.com/i/nodes/R1zknDm0WR6XzZ4Lt9yGG3qeWBQEx5rG?utm_scene=team_space

The Purpose of Ai Tools
What is Tensor Art?Tensor Art is a web-based platform that provides users with the ability to generate, edit, and share AI-created images. It hosts a vast collection of AI models and offers a user-friendly interface that simplifies the often-complex process of AI image generation. A key feature that sets Tensor Art apart is its "AI Tools," which are built upon a node-based workflow, allowing for a high degree of customization and control over the final outputThe Core of Tensor Art: A Node-Based WorkflowAt the heart of Tensor Art's "AI Tools" is a visual, node-based workflow system powered by ComfyUI.3 This system allows users to construct their image generation process by connecting different "nodes," each representing a specific function. This modular approach offers a transparent and flexible way to create and manipulate AI-generated images. The fundamental nodes in a typical workflow include:Load Checkpoint: This node allows users to select the foundational AI model for their image generation.CLIP Text Encode: This is where the user inputs their text prompt, which the AI then interprets to generate the image.KSampler: This node is central to the image generation process, utilizing a sampling method to create the image based on the prompt and model.VAE Decode: This node decodes the generated image into a visually comprehensible format.Save Image: As the final step, this node saves the generated image.In addition to these basic nodes, users can incorporate others to further refine their creations, such as Load LoRA for applying specific styles or character models.A Rich General Toolbox of FeaturesText-to-Image GenerationText-to-Video GenerationImage-to-Image GenerationImage-to-Video GenerationSpecial task workflows, such as:Map Extractors (Depth, Normal, Canny or Open Pose)For customized charactersPre-built "Quick Tools": For users who prefer a more streamlined experience. These are pre-configured workflows designed for direct body positions, try-on for clothing for a specific task.Community and AccessibilityIn conclusion, Tensor Art's "AI Tools" offer a robust and versatile platform for AI art creation. Its node-based workflow provides a high degree of control and transparency, while its diverse range of features and pre-built tools make it accessible to users of all skill levels. Whether you are a seasoned AI artist or just beginning your creative journey, Tensor Art provides the tools and community to explore the limitless possibilities of AI-generated art.

Animatensor - Prompting Guide
AnimaTensor, is the ultimate anime-themed finetuned SDXL model. The model was trained from Animagine XL 4.0-Zero to converting the model to support V-prediction and Zero-terminal SNR. Trained on anime-style images from danbooru with the knowledge cut-off of January 7th 2025. Similar to the base model, this model was trained using tag ordering method for the identity and style training.Animatensor PRO: https://tensor.art/models/875968258996450530/AnimaTensor-Pro-ProAnimatensor REGULAR: https://tensor.art/models/875952002545262935/AnimaTensor-RegularTo generate on this new model, you can check this Ai Tool: https://tensor.art/template/878775865159195620User GuideFirst things first, the order of tags is crucial in this model. At this point, we strongly recommend following our suggested prompt guidelines by placing tags in the correct order.[Gender], [Character], [From What Series], [Rating Tag], [Artist Tags], [General Tag], [Quality Tags]Example1girl, mita \(miside\), cool mita \(miside\), miside, animal ear headwear, blue gloves, blue hat, blue skirt, cabbie hat, choker, collarbone, gloves, hat, looking at viewer, low ponytail, ponytail, purple eyes, purple hair, red choker, red sweater, skirt, smile, sweater, teardrop facial mark, v, sensitive, field, sensitive, masterpiece, high score, great score, absurdresFrom What SeriesIt is mandatory to put series tag inside your prompt list. If you want to generate your own original character? You can skip this step and just go ahead with the general tags right after gender tag.Rating TagsBy putting rating tags (safe, sensitive, nsfw, or explicit) inside your prompt list, you have bigger chance to make your generated images better suited to the rating you’re aiming for. Putting safe rating tag will make the model more likely to generate safe for work image, sensitive for more revealing clothings. NSFW tag, like the name suggest (”not safe for work”), can yield even more revealing clothes/nudity, while explicit tag can yield sexual act. Take a look at these examples below (and of course, for an obvious reason, we cannot provide examples for NSFW tag and Explicit tag.)Artist TagsWe recommend placing [Artist Tags] before [Geneal Tags]. Similarly, using artist tags for a character without including their series tags is not advised. Using artist tags without character’s corresponding series tags significantly weakens their effect.Quality Tagsmasterpiece, high score, great score, absurdresTo place quality tags at the conclusion of your prompts rather than at the beginning. It is possible to activate the artist tags. Other quality tags, such as extremely aesthetic, aesthetic, displeasing, and very displeasing, can be added to both positive and negative categories.Negative Prompts: lowres, bad anatomy, bad hands, text, error, missing finger, extra digits, cropped, worst quality, low quality, bad score, signature, watermark, blurryReferenceshttps://github.com/cagliostrolab/dataset-builder/blob/main/animagine-xl-3.1/3.%20aesthetic_scorer.ipynbhttps://cagliostrolab.net/https://github.com/cagliostrolab

My 'Model Training' Parammeters for the 'Christmas Model' task of 'Christmas Walkthrough' event
Hello!, I've made a LoRA in TensorArt, and i want to share the processhttps://tensor.art/models/806550646066228285/Christmas-Walkthrough-2024-Merry-ChristmasTutorial for FluxHave an Idea (Christmas)Get a Dataset, [min 1024x1024]Dataset: https://mega.nz/file/DAdHiLwA#-swbYhXvbH2-zMav4JflUDZuERoY-lt_y4RMq7HpzM8Upload your DatasetSelect Batch Cutting: config for 'vertical, horizontal or squared' depending on your dataset, mine is vertical.Select Auto Labeling: config for 'florence2, natural lenguage' or enter your captions manually; I'll do both, first auto labeling and then selecting Add Batch Labels to caption my Keywords. Its Important match the 'Keen n Tokens' with the number of Keywords desired.Keywords: traditional media, christmas parody, fine art, 1940 \(style\)Config the rest of parammeters (see below)You're done, start training!

Christmas Walkthrough | Add Radio Buttons to an old Ai Tool.
What are Radio Buttons?They allow you to use name syntax in your prompt to get a lines of prompt from a file. in TensorArt we will use it as susbtitition for personalized wildcards. So Radio Buttons are pseudo-wildcards. Check this article to know how to manipulate and personalize them. Radio Buttons requires a <Clip Text Encoder> node to be storo within.What do we need?Any working Ai ToolIn my current exploration only certain <CLIP Text Encoder> nodes allows you to use them as Radio Button containers. For this example I'll use my ai tool: 📸 Shutterbug | SD3.5L Turbo.Duplicate/Download your Ai Tool workflow (To have a Backup).Add a <CLIP Text Encode> node.Add a <Conditioning Combine> node,Ensamble the nodes as the illustration shows; be careful with the combine method, use concat if you're not experienced at combining clips, this will instruct your prompting to ADD the Radio Button calling prompt.💾 Save your Ai Tool workflow.Go to Edit mode in your Ai Tool.Export your current User-configurable Settings (JSON).↺ Update your Ai Tool.Import your old User-configurable Settings (JSON).Look for the new <CLIP TextEncode> node, and load it.Hover over the <CLIP TextEncode> new tab, and select Edit.Config your Radio Buttons.Publish your Ai Tool.Done! Enjoy the Radio Button feature in your Ai Tools, so in my case my new Ai Tool looks like this:📹 Shutterbug | SVD & SD3.5L Turbo.Note: I also included SVD video to meet the requirements of the Christmas Walkthrough event.

🎃 Halloween2024 | Optimizing Sampling Schedules in Diffusion Models
You migh have seen this kind of images in the past if you've girly tastes when navigate on pinterest, well guess what? I'll teach you about some parammeters to enhance your Pony SDXL future generations. It's been a while since my last post, today I'll teach you about a cool feature launched by NVIDIA on July 22, 2024. For this task I'll provide an alternative workflow (Diffusion Workflow) for SDXL. Now lets go with the content.ModelsFor my research (AI Tool) I decided to use the next models:Checklpoint model: https://tensor.art/models/757869889005411012/Anime-Confetti-Comrade-Mix-v30.60 LoRA: https://tensor.art/models/7025156632998356040.80 LoRA: https://tensor.art/models/757240925404735859/Sailor-Moon-Vixon's-Anime-Style-Freckledvixon-1.00.75 LoRA: https://tensor.art/models/685518158427095353NodesThe Diffusion Workflow has many nodes I've merged in single nodes I'll explain them below, remember you can group nodes and edit their values to enhance your experience.👑 Super Prompt Styler // Advanced Manager (CLIP G) text_positive_g: positive prompt, subject of the scene (all the elements the scene is meant for, LoRA Keyword activators).(CLIP L) text_positive_l: positive prompt, all the scene itself is meant (composition, lighting, style, scores, ratings).text:negative: negative prompt.◀Style▶: artistic styler, select the direction for your prompt, select 'misc Gothic' for halloween direction.◀Negative Prompt▶: prepares the negative prompt splitting it in two (CLIP G and CLIP L) for the encoder.◀Log Prompt▶: add information to metadata, produces error 1406 when enabled, so turn it off.◀Resolution▶: select the resolution of your generation.👑 Super KSampler // NVIDIA Aligned Stepsbase_seed: similar to esnd (know more here).similarity: this parameter influences base_seed noise to be similar to noise_seed value.noise_seed: the exact same noise seed you know.control after generate: dictates the behavior of noise_seed.cfg: guidance for the prompt, read about <DynamicThresholdingFull> to know the correct value. I recomend 12sampler_name: sampling method.model_type: NVIDIA sampler for SDXL and SD models.steps: the exact same steps you know, dictates how much the sampling denoises the noise injected.denoise: the exact same denoise you know, dictates the strong the sampling denoises the noise injected.latent_offset: select between {-1.00 Darker to 1.00 Brighter} to modify the input latent, any value different than 0 adds information to enhance final result.factor_positive: upscale factor for the conditioning.factor_negative: upscale factor for the conditioning.vae_name: the exact same vae you know, dictates how the noise injected is denoised by the sampler.👑 Super Iterative Upscale // Latent/on Pixel Spacemodel_type: NVIDIA sampler for SDXL and SD models.steps: number of steps the UPSCALER (Pixel KSampler) will use to correct the latent on pixel space while upscaling it.denoise: dictates the strenght of the correction on the latent on pixel space.cfg: guidance for the prompt, read about <DynamicThresholdingFull> to know the correct value. I recomend 12upscale_factor: number of times the upscaler will upscale the latent (must match factor_positive and factor_positive) upscale_steps: dictates the number of steps the UPSCALER (Pixel KSampler) will use to upscale the latent.MiscellaneousDynamicThresholdingFullmimic_scale: 4.5 (Important value. go to learn more)threshold_percentile: 0.98mimic_mode: half cosine downmimic_scale_min: 3.00cfg_mode: half cosine downcfg_scale_min: 0.00sched_val: 3.00separate_feature_channels: enablescaling_starpoint: meanvariability_measure: ADinterpolate_phi: 0.85Learn more: https://www.youtube.com/watch?v=_l0WHqKEKk8Latent OffsetLearn more: https://github.com/spacepxl/ComfyUI-Image-Filters?tab=readme-ov-file#offset-latent-imageAlign Your StepsLearn more: https://research.nvidia.com/labs/toronto-ai/AlignYourSteps/LayerColor: Levelsset black_point = 0 (base level of black)set white_point = 255 (base level of white)Set output_black_point = 20 (makes blacks less blacks)Set output_white_point = 220 (makes whites less whites)Learn more: https://docs.getsalt.ai/md/ComfyUI_LayerStyle/Nodes/LayerColor%3A%20Levels/LayerFilter:Filmcenter_x: 0.50center_y: 0.50saturation: 1.75vignete_intensity: 0.20grain_power: 0.50grain_scale: 1.00grain_sat: 0.00grain_shadows: 0.05grain_highs: 0.00blur_strenght: 0.00blur_focus_spread: 0.1 focal_depth: 1.00Learn more: https://docs.getsalt.ai/md/ComfyUI_LayerStyle/Nodes/LayerFilter%3A%20Film/?h=filmResultAi Tool: https://tensor.art/template/785834262153721417DownloadsPony Diffusion Workflow: https://tensor.art/workflows/785821634949973948

Hunyuan-DiT: Recommendations
ReviewHello everyone; I want to share some of my impressions about the Chinese model, Hunyuan-DiT from tencent. First of all let’s start with some mandatory data to know so we (westerns) can figure out what is meant for:Hunyuan-DiT works well as multi-modal dialogue with users (mainly Chinese and English language), the better explained your prompt the better your generation will be, is not necessary to introduce only keywords, despite it understands them quite well. In terms of rating HYDiT 1.2 is located between SDXL and SD3; is not as powerful than SD3, defeats SDXL almost in everything; for me is how SDXL should’ve be in first place; one of the best parts is that Hunyuan-DiT is compatible with almost all SDXL node suit.Hunyuan-DiT-v1.2, was trained with 1.5B parameters.mT5, was trained with 1.6B parameters.Recommeded VAE: sdxl-vae-fp16-fixRecommended Sampler: ddpm, ddim, or dpmmsPrompt as you’d like to do in SD1.5, don’t be shy and go further in term of length; HunyuanDiT combines two text encoders, a bilingual CLIP and a multilingual T5 encoder to improve language understanding and increase the context length; they divide your prompt on meaningful IDs and then process your entire prompt, their limit is 100 IDs or to 256 tokens. T5 works well on a variety of tasks out-of-the-box by prepending a different prefix to the input corresponding to each task.To improve your prompt, place your resumed prompt in the CLIP:TextEncoder node box (if you disabled t5), or place your extended prompt in the T5:TextEncoder node box (if you enabled t5).You can use the "simple" text encode node to only use one prompt, or you can use the regular one to pass different text to CLIP/T5.The worst is the model only benefits from moderated (high for TensorArt) step values: 40 steps are the basis in most cases.Comfyui (Comfyflow) (Example)TensorArt added all the elements to build a good flow for us; you should try it too.AdditionalWhat can we do in the Open-Source plan? (link)Official info for LoRA training (link)ReferencesAnalysis of HunYuan-DiT | https://arxiv.org/html/2405.08748v1Learn more of T5 | https://huggingface.co/docs/transformers/en/model_doc/t5How CLIP and T5 work together | https://arxiv.org/pdf/2205.11487

🆘 ERROR | Exception
Exception (routeId: 7544339967855538950230)Suspect nodes:<string function>. <LayeStyle>, <LayerUtility>, <FaceDetailer>, many <TextBox>, <Bumpmap>After some reseach (on my own) I've found<FaceDetailer> node is completely broken<TextBox> and <MultiLine:Textbox> node will cause this error if you introduce more than 250+ characters, I'm not very sure about this number, but you won't be able to introduce a decent amount of text anymore.More than 40 nodes, despite its function will couse this error.How do i know this? Well I made a functional comfyflow following those rules:https://tensor.art/template/754955251181895419The next functional comfyflow suddelny stopped from generating, it's almost the same flow than the previous, but with <FaceDetailer> and large text strings to polish the prompt. It works again yay!https://tensor.art/template/752678510492967987 proof it really worked (here)I feel bad for you if this error suddenly disrupt your day; feel bad for me cuz I bought the yearly membership of this broken product I can't refound. I'll be happy to delete this bad review if you fix this error.News081124 | <String Function> has been taken down. Comfyflow works slowly (but works)081024 | eveything is broken again lmao, we cant generate outside TAMS.080624 | <reroute> output node could trigger this error when linked to many inputs.072824 | <FaceDetailer> node seems to work again.

Understanding the Impact of Negative Prompts: When and How Do They Take Effect?
📝 - SynthicalThe Dynamics of Negative Prompts in AI: A Comprehensive Study by: Yuanhao Ban UCLA, Ruochen Wang UCLA, Tianyi Zhou UMD, Minhao Cheng PSU, Boqing Gong, Cho-Jui Hsieh UCLAEThis study addresses the gap in understanding the impact of negative prompts in AI diffusion models. By focusing on the dynamics of diffusion steps, the research aims to answer the question: "When and how do negative prompts take effect?". The investigation categorizes the mechanism of negative prompts into two primary tasks: noun-based removal and adjective-based alteration.The role of prompts in AI diffusion models is crucial for guiding the generation process. Negative prompts, which instruct the model to avoid generating certain features, have been less studied compared to their positive counterparts. This study provides a detailed analysis of negative prompts, identifying the critical steps at which they begin to influence the image generation process.FindingsCritical Steps for Negative PromptsNoun-Based Removal: The influence of noun-based negative prompts peaks at the 5th diffusion step. At this critical step, negative prompts initially generate a target object at a specific location within the image. This neutralizes the positive noise through a subtractive process, effectively erasing the object. However, introducing a negative prompt in the early stages paradoxically results in the generation of the specified object. Therefore, the optimal timing for introducing these prompts is after the critical step.Adjective-Based Alteration: The influence of adjective-based negative prompts peaks around the 10th diffusion step. During the initial stages, the absence of the object leads to a subdued response. Between the 5th and 10th steps, as the object becomes clearer, the negative prompt accurately focuses on the intended area and maintains its influence.Cross-Attention DynamicsAt the peak around the 5th step for noun-based prompts, the negative prompt attempts to generate objects in the middle of the image, regardless of the positive prompt's context. As this process approaches its peak, the negative prompt begins to assimilate layout cues from its positive counterpart, trying to remove the object. This represents the zenith of its influence.For adjective-based prompts, during the peak around the 10th step, the negative prompt maintains its influence on the intended area, accurately targeting the object as it becomes clear.The study highlights the paradoxical effect of introducing negative prompts in the early stages of diffusion, leading to the unintended generation of the specified object. This finding suggests that the timing of negative prompt introduction is crucial for achieving the desired outcome.Reverse Activation PhenomenonA significant phenomenon observed in the study is Reverse Activation. This occurs when a negative prompt, introduced early in the diffusion process, unexpectedly leads to the generation of the specified object within the context of that negative prompt. To explain this, researchers borrowed the concept of the energy function from Energy-Based Models to represent data distribution.Real-world distributions often feature elements like clear blue skies or uniform backgrounds, alongside distinct objects such as the Eiffel Tower. These elements typically possess low energy scores, making the model inclined to generate them. The energy function is designed to assign lower energy levels to more 'likely' or 'natural' images according to the model’s training data, and higher energy levels to less likely ones.A positive difference indicates that the presence of the negative prompt effectively induces the inclusion of this component in the positive noise. The presence of a negative prompt promotes the formation of the object within the positive noise. Without the negative prompt, implicit guidance is insufficient to generate the intended object. The application of a negative prompt intensifies the distribution guidance towards the object, preventing it from materializing.As a result, negative prompts typically do not attend to the correct place until step 5, well after the application of positive prompts. The use of negative prompts in the initial steps can significantly skew the diffusion process, potentially altering the background.ConclusionsDo not step less than 10th times, going beyond 25th times does not make the difference for negative prompting.Negative prompts could enhance your positive prompts, depending on how well the model and LoRA have learn their keywords, so they could be understood as an extension of their counterparts.Weighting-up negative keywords may cause reverse activation, breaking up your image, try keeping the ratio influence of all your LoRAs and models equals.Referencehttps://synthical.com/article/Understanding-the-Impact-of-Negative-Prompts%3A-When-and-How-Do-They-Take-Effect%3F-171ebba1-5ca7-410e-8cf9-c8b8c98d37b6?
![Stable Diffusion [Floating Point, Performance in the Cloud]](https://image.tensorartassets.com/cdn-cgi/image/anim=true,plain=false,w=112,q=85/article/619049867326525670/d51bea82-0a40-4b62-b9da-474af451c06e.jpg)
Stable Diffusion [Floating Point, Performance in the Cloud]
Overview of Data Formats used in AIfp32 is the default data format used for training, along with mixed-precision training that uses both fp32 and fp16. fp32 has more than adequate scale and definition to effectively train the most complex neural networks. It also results in large models both in terms of parameter size and complexity.fp16 data format both in hardware and software with good performance. In running AI inference workloads, the adoption of fp16 instead of the mainstream fp32 offers tremendous advantages in terms of speed-up while reducing power consumption and memory footprint. This advantage comes with virtually no accuracy loss. The switch to fp16 is completely seamless and does not require any major code changes or fine-tuning. CPUs will improve their AI inference workload performance instantly. Overview of Data Formats used in AI fp32 is the default data format used for training, along with mixed-precision training that uses both fp32 and fp16. fp32 has more than adequate scale and definition to effectively train the most complex neural networks. fp32 can represent numbers between 10⁻⁴⁵ and 10³⁸. In most cases, such a wide range is wasteful and does not bring additional precision. The use of fp16 reduces this range to 10⁻⁸ and 65,504 and cuts in half the memory requirements while also accelerating the training and inference speeds. Make sure to avoid under and overflow situations.Once the training is completed, one of the most popular ways to improve performance is to quantize the network. A popular data format used in this process, mainly in edge applications is int8 and results in at most a 4x reduction in size with a notable performance improvement. However, quantization into int8 frequently leads to some accuracy loss. Sometimes, the loss is limited to a fraction of a percent but often results in a few percent of degradation, and in many applications, this degradation becomes unacceptable.There are ways to limit accuracy loss by doing quantization-aware training. This consists of introducing the int8 data format selectively and/or progressively during training. It is also possible to apply quantization to the weights while keeping activation functions at fp32 resolution. Though these methods will help limit the accuracy loss, they will not eliminate it altogether. fp16 is a data format that can be the right solution for preventing accuracy loss while requiring minimal or no conversion effort. Indeed, it has been observed in many benchmarks that the transition from fp32 to fp16 results in no noticeable accuracy without any re-training.ConclusionFor NVIDIA GPUs and AI, deploy in fp16 to double inference speeds while reducing the memory, footprint and power consumption. Note: If the original model was not trained using fp16, its conversion to fp16 is extremely easy and does not require re-training or code changes. It is also shown that the switch to fp16 led to no visible accuracy loss in most cases.Source: https://amperecomputing.com/

Blender to Stabble Diffusion, animation workflow.
Source: https://www.youtube.com/watch?v=8afb3luBvD8Mickmumpitz guides us on how to use Stable Diffusion, a neural network-based interface, to generate masks and prompts for rendering 3D animations. The process involves setting up passes in Blender, creating a file output node, and then using Stable Diffusion's node-based interface for image workflow. Overall, the video demonstrates how to use these AI tools to enhance the rendering process of 3D animations.The process involves setting up render passes, such as depth and normal passes, in Blender to extract information from the 3D scene for AI image generation. Users can create mask passes to communicate which prompts to use for individual objects in the scene. Stable Diffusion, a neural network-based interface, is used to generate masks and prompts for rendering. Mickmumpitz tell us the differences between using Stable Diffusion and SDXL for image generation and video rendering, highlighting the advantages and disadvantages of each, demonstrating how to use Stable Diffusion 1.5 in Blender to generate specific styles and control the level of detail in the AI-generated scenes.Mickmumpitz shows an updated workflow for rendering 3D animations using AI with Blender and Stable Diffusion. He created simplistic scenes, including a futuristic cityscape and a rope balancing scene, to test the updated version. The workflow uses render passes, such as depth and normal passes, to extract information from the 3D scene for AI image generation. The speaker also explains how to create mask passes to communicate which prompts to use for individual objects in the scene. The workflow aims to make rendering more efficient and versatile.
![Stable Diffusion [ADetailer]](https://image.tensorartassets.com/cdn-cgi/image/anim=true,plain=false,w=112,q=85/article/619049867326525670/bbddd0de-a87e-40cb-aa32-ce46c8c2ef39.png)
Stable Diffusion [ADetailer]
After Detailer (ADetailer)After Detailer (ADetailer) is a game-changing extension designed to simplify the process of image enhancement, particularly inpainting. This tool saves you time and proves invaluable in fixing common issues, such as distorted faces in your generated images.Historically we would send the image to an inpainting tool and manually draw a mask around the problematic face area. After Detailer streamlines this process by automating it with the help of a face recognition model. It detects faces and automatically generates the inpaint mask, then proceeds with inpainting by itself.Exploring ADetailer ParametersNow that you've grasped the basics, let's delve into additional parameters that allow fine-tuning of ADetailer's functionality.Detection Model:ADetailer offers various detection models, such as face_xxxx, hand_xxxx, and person_xxxx, catering to specific needs.Notably, face_yolo and person_yolo models, based on YOLO (You Only Look Once), excel at detecting faces and objects, yielding excellent inpainting results.Model Selection:The "8n" and "8s" models vary in speed and power, with "8n" being faster and smaller.Choose the model that suits your detection needs, switching to "8s" if detection proves challenging.ADetailer PromptingInput your prompts and negatives in the ADetailer section to achieve desired results.Detection Model Confidence Threshold:This threshold determines the minimum confidence score needed for model detections. Lower values (e.g., 0.3) are advisable for detecting faces. Adjust as necessary to improve or reduce detections.Mask Min/Max Area Ratio:These parameters control the allowed size range for detected masks. Modifying the minimum area ratio can help filter out undesired small objects.The most crucial setting in the Inpainting section is the "Inpaint denoising strength," which determines the level of denoising applied during automatic inpainting. Adjust it to achieve your desired degree of change.In most cases, selecting "Inpaint only masked" is recommended when inpainting faces.ReferenceThinkDiffusion

TagGUI - captioning tool for model creators
📥 Download | https://github.com/jhc13/tagguiCross-platform desktop application for quickly adding and editing image tags and captions, aimed towards creators of image datasets for generative AI models like Stable Diffusion.FeaturesKeyboard-friendly interface for fast taggingTag autocomplete based on your own most-used tagsIntegrated Stable Diffusion token counterAutomatic caption and tag generation with models including CogVLM, LLaVA, WD Tagger, and many moreBatch tag operations for renaming, deleting, and sorting tagsAdvanced image list filteringCaptioning parametersPrompt: Instructions given to the captioning model. Prompt formats are handled automatically based on the selected model. You can use the following template variables to dynamically insert information about each image into the prompt:{tags}: The tags of the image, separated by commas.{name}: The file name of the image without the extension.{directory} or {folder}: The name of the directory containing the image.An example prompt using a template variable could be Describe the image using the following tags as context: {tags}. With this prompt, {tags} would be replaced with the existing tags of each image before the prompt is sent to the model.Start caption with: Generated captions will start with this text.Remove tag separators in caption: If checked, tag separators (commas by default) will be removed from the generated captions.Discourage from caption: Words or phrases that should not be present in the generated captions. You can separate multiple words or phrases with commas (,). For example, you can put appears,seems,possibly to prevent the model from using an uncertain tone in the captions. The words may still be generated due to limitations related to tokenization.Include in caption: Words or phrases that should be present somewhere in the generated captions. You can separate multiple words or phrases with commas (,). You can also allow the captioning model to choose from a group of words or phrases by separating them with |. For example, if you put cat,orange|white|black, the model will attempt to generate captions that contain the word cat and either orange, white, or black. It is not guaranteed that all of your specifications will be met.Tags to exclude (WD Tagger models): Tags that should not be generated, separated by commas.Many of the other generation parameters are described in the Hugging Face documentation.
![Stable Diffusion [Parameters]](https://image.tensorartassets.com/cdn-cgi/image/anim=true,plain=false,w=112,q=85/article/619049867326525670/3d3f165f-d4a5-4aac-b225-7666f38cc2e6.png)
Stable Diffusion [Parameters]
Stable DIfusion Intro.Stable Diffusion is an open-source text-to-image AI model that can generate amazing images from given text in seconds. The model was trained on images in the LAION-5B dataset (Large-scale Artificial Intelligence Open Network). It was developed by CompVis, Stable AI and RunwayML. All research artifacts from Stability AI are intended to be open sourced.Promp Engineering.Prompt Engineering is the process of structuring words that can be interpreted and understood by a text-to-image model. Is the language you need to speak in order to tell an AI model what to draw.A well-written prompt consisting of keywords and good sentence structure.Ask yourself a list of questions once you have in mind something.Do you want a photo or a painting, digital art?What’s the subject: a person, an animal the painting itself?What details are part of your idea?Special lighting: soft, ambient, etc.Environment: indoor, outdoor, etc.Colo scheme: vibrant, muted, etc.Shot: front, from behind, etc.Background: solid color, forest, etc.What style: illustration, 3D render, movie poster?The order of words is important.The order and presentation of our desired output is almost as an important aspect as the vocabulary itself. It is recommended to list your concepts explicitly and separately than trying to cramp it into one simple sentence.Keywords and Sub-Keywords.Keywords are words that can change the style, format, or perspective of the image. There are certain magic words or phrases that are proven to boost the quality of the image. sub-keywords are those who belong to the semantic group of keywords; hierarchy is important for prompting as well for LoRAS or Models design.Classifier Free Guidance (CFG default is 7)You can understand this parameter as “Ai Creativity vs {{user}} prompt”. Lower numbers give Ai more freedom to be creative, while higher numbers force it to stick to the prompt.CFG {2, 6}: if you’re discovering, testing or researching for heavy Ai influence.CFG {7, 10}: if you have a solid prompt but you still want some creativity.CFG {10, 15}: if your prompt is solid enough and you do not want Ai disturbs your idea.CFG {16, 20}: Not recommended, uncoherency.Step CountStable Diffusion creates an image by starting with a canvas full of noise and denoise it gradually to reach the final output, this parameter controls the number of these denoising steps. Usually, higher is better but to a certain degree, for beginners it’s recommended to stick with the default.SeedSeed is a number that controls the initial noise. The seed is the reason that you get a different image each time you generate when all the parameters are fixed. By default, on most implementations of Stable Diffusion, the seed automatically changes every time you generate an image. You can get the same result back if you keep the prompt, the seed and all other parameters the same.⚠️ Seeding is important for your creations, so try to save a good seed and slightly tweak the prompt to get what you’re looking for while keeping the same composition.SamplerDiffusion samplers are the method used to denoise the image during generation, they take different durations and different number of steps to reach a usable image. This parameter affects the step count significantly; a refined one could reduce or increase the step count giving more or less subjective detail.CLIP SkipFirst of all we need to know what CLIP is. CLIP, which stands for Contrastive Language Image Pretraining is a multi-modal model trained on 400 million (image, text) pairs. During the training process, a text and image encoder are jointly trained to predict which caption goes with which image as shown in the diagram below.Just think on this like the size like a funnel which uses SD to comb obtained information from its dataset; big numbers result in many information to process, so the final image is not presize. Lower numbers narrow down the captions on the dataset, so you'd get more accurated results.Clip Skip {1}: Strong concidences and less liberty.Clip Skip {2}: Nicer concidences and few liberty.Clip Skip {3-5}: Many concidences and high liberty.Clip Skip {6}: Unexpeted results.ENSD (Eta Noise Seed Delta)Its like a slider for the seed parameter; you can get different image results for a fixed seed number. So... what is the optimal number? There is not. Just use your lucky number, you're ponting the seeding to this number. If you are using a random seed every time, ENSD is irrelevant.So why people use 31337 commonly? Known as eleet or leetspeak, is a system of modified spellings used primarily on the Internet. Its a cabalistic number, its safe using any other number.ReferencesAutomatic1111OpenArt Prompt BookLAIONLAION-5B Paper1337
![Stable Diffusion [Weight Syntax]](https://image.tensorartassets.com/cdn-cgi/image/anim=true,plain=false,w=112,q=85/article/619049867326525670/cbfd0a5e-5386-435c-adae-a4e8ba2cbf3d.png)
Stable Diffusion [Weight Syntax]
Weight (Individual CFG for keywords): Colon stablish weight slider on keywords changing its default value(1.00 = default = x).( ) Round brackets, for modifying keyword’s value, example (red) means red:1.10(keyword) means (x+0.1x), if x=1 ⇒ (1+1(0.1)) = 1.10((keyword)) means (x+0.1x)², if x=1 ⇒ (1+0.1))² = 1.21(((keyword))) means (x+0.1x)³, if x=1 ⇒ (1+0.1))³ = 1.33((((keyword)))) means (x+0.1x)⁴, if x=1 ⇒ (1+0.1))⁴ = 1.46+ Plus, for modifying keyword’s value, example red+ means red:1.10keyword+ means (x+0.1x), if x=1 ⇒ (1+1(0.1)) = 1.10keyword++ means (x+0.1x)², if x=1 ⇒ (1+0.1))² = 1.21keyword+++ means (x+0.1x)³, if x=1 ⇒ (1+0.1))³ = 1.33keyword++++ means (x+0.1x)⁴, if x=1 ⇒ (1+0.1))⁴ = 1.46… etc[ ] Square Bracket, for modifying keyword’s value, example [red] means red:0.90[keyword] means (x+0.1x), if x=1 ⇒ (1-1(0.1)) = 0.90[[keyword]] means (x+0.1x)², if x=1 ⇒ (1-0.1))² = 0.81[[[keyword]]] means (x+0.1x)³, if x=1 ⇒ (1-0.1))³ = 0.72[[[[keyword]]]] means (x+0.1x)⁴, if x=1 ⇒ (1+0.1))⁴ = 0.65… etc- Minus, for modifying keyword’s value, example red+ means red:0.90keyword- means (x+0.1x), if x=1 ⇒ (1-1(0.1)) = 0.90keyword-- means (x+0.1x)², if x=1 ⇒ (1-0.1))² = 0.81keyword--- means (x+0.1x)³, if x=1 ⇒ (1-0.1))³ = 0.72keyword---- means (x+0.1x)⁴, if x=1 ⇒ (1+0.1))⁴ = 0.65… etcIn theory you can combine, or even bypass the limit values (0.00 - 2.00) with the correct script or modification in your dashboard.